Showing posts with label Tricks. Show all posts

Monday, September 6, 2010

Ladkiya Patane Ke 101 Formulas


Formula 1
Hamesha Ladki ke aankho se aankhen milakar hi baat kare, isse Ladkiyan impress hoti hai.
Formula 2
Ladkiyon se jab bhi mile ek pyaari si smile jarur kare.
Formula 3
Hamesha unki help ke liye taiyaar rahe.
Formula 4
unka Birth day kabhi naa bhule aur unhe koi Beautiful gift jarur de, yaa ek Rose.
Formula 5
uus par kabhi bhi gussa na kare, Hamesha pyaar se hi pesh aaye.
Formula 6
Ladkiyan Shayari pasand karti hai, isliye aksar unhe unki khubsurti par koi Shayari sunate rahe, aisa karte rahne se wo aapke pyaar me pagal ho jayegi.
Formula 7
unse hamesha achche Dress me hi mile, yaad rakhe aap ko bhi attractive dkhna padega.
Formula 8
agar aap ek hi class me hai to unko Study me yaa Notes banane me Help karte rahe, aisa karne se aap unke aur bhi karib aate jaenge.
Formula 9
Aap jab bhi unse mile unhe Hi yaa Hello yaa Shake hand karna na bhule, isse apna pan badata jaega.
Formula 100
Ladkiyon ko Good personality wale Ladke bahut achche lagte hai, issliye koi achchi si Gym me exercise kar apni Body ko attractive banaye. isse Ladkiyan aapko dekhte hi impress ho jaengi.
Formula 11
Agar aapke pass cell phone hai aur us ladki ke paas bhi ( jise aap patana chahte hai), to aksar usko Funny SMS yaa Love SMS yaa Friendship SMS bhejte rahe. aisa karne se aap unki yaado me bane rahenge.
Formula 12
Friendship aur Valentines day ko unhe hamesha wish kare aur ek Pyara sa Gift jarur de. aisa karna najdiki badane ke liye bahut jaruri hai.
Formula 13
Ladkiyon se hamesha Romantic mood me hi baat kare, aise baat kare jisse unhe lage ki aap ko unse baat karke bahut hi maza aa raha hai.
Formula 14
Hamesha unko Respect de, isse aap unki nazaron me ek achche Ladke bane rahenge, jo Ladki patane ke liye bahut hi jaruri hai.
Formula 15
Ladkiyon se kabhi mat sharmaiye, Maximum Ladki sharmile Ladko ko pasand nahi karti hai, issliye hamesha frankly unse mile.
Formula16
Apni Personality perfect rakhne ke liye hamesha chust durust dikhe, na ki sust yaa kaamchor. Ladkiyan furtile Ladko ko hi pasand karti hai.
Formula 17
agar Ladki Filmo ki shaukin hai to usse aksar Film ke hi bare me baate kare, isse wo aapse apni feeling bantkar khush aur impress hongi.
Formula 18
aap apne din ki shuruwat unhe ek mast Good Morning SMS bhejkar karen.
Formula 19
Raat ko sone se pahle ek Pyara sa Good Night SMS bhejkar bhi aap unhe impress kar sakte hai.
Formula 20
Ladkiyon se usi topic par baat-chit karo jis me use baat karne me maza aaye, isse wo aapse bahut samay tak baat kar sakti hai. aur aapki Dosti Pyar me bhi badal sakti hai.
Formula 21
Ladkiyon ke samne hamesha apna Cina taan kar chale, aisa karne se Mardangi jhalkti hai aur Ladkiyan Mardon ko hi pasand karti hai.
Formula 22
Ladkiyan darpok ladko ko pasand nahi karti hai issliye aap darna chhod de aar Ladkiyon se ek nidar ki tarah react kare.
Formula 23
agar Ladki aapse kuch mange to use jarur pura karne ki koshish kare, isse Ladkiyan aapse itni impress hongi jiski aap imagine bhi nahi kar sakte.
Formula 24
Unke Birth day par sabse pehle aap wish kare, isse wo aapko kabhi nahi bhul payengi.
Formula 25
Hamesha unse kisi na kisi bahane milte rahe, isse aap unki nazaron aur yaado me aksar bane rahenge.
Formula 26
unhe Dinner ya Lunch ke liye offer kare, ager wo agree ho jaye to unke pasand ke hotel me unke pasand ki dish order kare. wo turant aap par fida ho jayegi.
Formula 27
Ladkiyon se pehle Dosti karo baad me unse apne Dil ki baat kahna, Pyar ke mamle me patience se kaam le.
Formula 28
jab wo aap se baat kare to unki baato ko unki aankon me aankhen dalkar dhyanpurvak sune.
Formula 29
Agar Ladki aapki neighbor ho to roz subah unko dekhte hi Good Morning jarur kahe.
Formula 30
Agar Ladki aapki Class met ho to unse shake hand jarur kare.
Formula 31
Agar aap unke sath antakhari khele to unko target karke Loveable song jarur gaye.
Formula 32
Agar wo aapse raste par Lift mange to aap use jarur de, aur aise react kare jaise aap bahut jaruri kaam se ja rahe the Lekin unke liye aapne jaruri kaam chhod kar unhe Lift di, isse wo aap se Impress hue bina nahi rah sakegi aur aap use aasani se pata lenge.
Formula 33
agar wo koi problem me ho to sabse pehle unki help ke liye aap pahuche, ye Ladki patane ke liye jaruri sabak hai.
Formula 34
Ladkiyan bahut emotional hoti hai isliye unki emotion ki hamesha sammaan kare.
Formula 35
agar Ladki koi bhari kaam kar rahi hai to aap unki madad jarur kare. kaam me hath batane se Pyar badata hai.
Formula 36
agar School/College me unki Gaadi ka Petrol khatam ho gaya ho to aap apni Gaadi ka Petrol nikalkar jarur de.
Formula 37
unse hamesha hansi mazak karte rahe, Lekin ek limit me hi.
Formula 38
agar Ladki kahi paidal ja rahi ho to aap unhe apni Bike me Pahucha dene ka offer jarur kare, aisa impression jamane ke liye badiya mauka hai.
Formula 39
aap kisi Ladki ko bahut pyar karte hai to apni feeling ko Pink color ke paper par likhkar unhe jarur de, yaani unhe Love Letter likhe.
Formula 40
Maximum Ladkiyan Funny Ladke pasand karti hai, isliye aapko bhi Funny banana padega.
Formula 41
Jab bhi aap Ladkiyon se mile to unhe ek Mazedar Jokes jarur sunaye, yaa kuch Funny Shayari hi. (click here for Funny SMS & Funny Shayari Collection)
Formula 42
agar wo Morning walk karne jati hai to aap bhi uske sath sath walk karne jaye, subah ke mast mahaul me aap unse Mazedar baate kar unhe impress kar sakte hai.
Formula 43
agar unke paas cell phone hai to kisi bhi bahane unse Contact karte rahiye, aur SMS bhi bhejte rahiye. (click here for World’s largest collection of SMS)
Formula 44
agar unka tabiyat thik naa ho to unse milne jarur jaye, aur unka haal chaal jarur puche.
Formula 45
apne Birth Day me unhe invite karna na bhule, aur aaye to ye kahna “aap hi ka intzar kar raha tha, ab aap aa gai ho ab mai Cake katunga.
Formula 46
unke diye hue Gift ki tarif jarur kare, tarif karna Deep me Ghee dalne ke saman hai.
Formula 47
agar unka Mail ID aap jante ho to unko Mail karte rahe aur ye ehsas dilaye ki aap dinbhar unki hi khayalo me khoye rahte hai.
Formula 48
agar aap ko apne Padosan ko patana ho to unke ghar aate jate rahe aur jarurat padne par unki madad karte rahe.
Formula 49
agar Padosan ka bhai bhi hai to, Pehle uske bhai se Dosti karo, uske bhai ki nazaro me aap ek samajhdar Ladke ki tarah raho, isse aapka unke ghar aana jana laga rahega.
Formula 50
Har insan apni tarif sunana chahta hai, isliye aap Ladki ke har Chijo ki tarif karte rahe.
Formula 51
Ladkiyon se hamesha Confidence ke sath hi baat kare.
Formula 52
agar aap kisi Ladki ko Patana chahte hai to usse baat karne ki koshish kare. aur apni feeling ko kisi din Letter me likhkar unhe de do. isse Ladki aapke Himmat ki Kayal ho jayegi.
Formula 53
agar unka koi Nick name ho to aap unko Nick name se hi pukare. isse aap unko apne se lagenge.
Formula 54
Jab bhi aap unse mile to unko uske pasand ki Chocolate jarur de. Ladkiyon ke shauk pure karne se unko Patane me aasani hoti hai.
Formula 55
agar Ladki ice-cream khane ki shaukin ho to unko jarur isske liye offer karte rahe..
Formula 56
Ladkiyan agar group me ho to aap unhe (Jinhe Patana hai) hi dekhte rahe, aisa karne se wo bhi aap ke taraf attract ho jaegi.
Formula 57
agar aap kisi Ladki ko Propose karna chahte ho to, aap unka ek hath pakadkar unhe Red Rose dekar Propose kare. wo aap ka Proposal jarur accept kar legi.
Formula 58
unki har ada ki tarif jarur kare, wo jarur khush hongi.
Formula 59
Propose karna Mard ka kaam hai iss liye aap ye mat soche ki Ladki aakar aapko Propse karengi, Pahle aapko hi Propose karna hoga.
Formula 60
agar wo kabhi aapke ghar ke samne se gujre to use apne ghar jarur bulayen, aur Chaay ya Coffee jarur pilaye. isse wo aapke mehman navaji ki kayal ho jayegi.
Formula 61
agar aap unka ghar jante hai to Holi ke din uske ghar unke sath Holi khelne jana na bhule aur unke sath khub hansi mazak kare.
Formula 62
agar aap Party me kisi Ladki ko Patana chahte ho to, aap sabse pehle unse jakar mile aur apna Introduction de, isse dhire-dhire baat chit ka silsila shuru hoga aur aap use Pata lenge.
Formula 63
aap ki Padosan agar School/College jane ke liye nikal rahi ho to aap unke sang hole aur unse baat karte hue aap bhi jaye. aisa Continue 3 Dino tak kare aur 4th Din mat jana, wo 5th Din aapse jarur puchegi kal kyu nahi aaye. aur iss tarah mulakat se aap use Pata hi lenge.
Formula 64
Ladki Patane ke liye Confidence bahur hi jaruri hai isliye aap Pahle apne aap pe bharosa rakhiye ki aap use Pata kar hi Dumm lenge, aur aap apne Confidence ke bal par hi use Pata lenge.
Formula 65
Ladkiyan Patane ke liye apne aap me kuch quality paida kare, jaise Singing, Dancing, Body Building, Acting. quality hone se Ladki Patana bahut asan ho jata hai.
Formula 66
agar aap me koi buri aadat ho to use chhod de, bure Ladke pasand nahi kiye jate hai, isliye apni buri aadato ko chod de.
Formula 67
Ladkiyon ke samne kabhi bhi Smoking na kare aur na hi Drinking. ye baat hamesha yaad rakhe Ladkiyan Good Manners wale Ladko ko hi Pasand karti hai.
Formula 68
Ladkiyon ke samne kabhi bhi Gandi baate naa kare isse aapka unke samne ek bad boy ki image ban jaygi. aap unke samne Talented person ki tarah hi Behavior kare.
Formula 69
agar aap jante hai ki wo kis Film Hero ki Fane hai to aap usi Hero ke jaisi Hare Style rakhe aur usi ki tarah dikhne ki khoshish kare. Ladki aapse impress hogi hi.
Formula 70
aap hamesha unse sach bolne ki koshish kare, isse aap unhe sachche Ladke lagenge. jo ki impress karne ke liye jaruri hai.
Formula 71
aap unke prati hamesha vafadar rahe, har Ladkiyan ek vafadar sathi ki talash me rehti hai.
Formula 72
agar aapke makaan ke kiraye daar ko Patana ho to uske kuch mahine ka Kiraya maaf karde. isse aapki unse najdikiyan badengi. aur wo aapka ehsan mand ho jaengi
Formula 73
Ladkiyan hazirjawab Ladkon ko Pasand karti hai issliye aap hazirjawab dene wale person baniye.
Formula 74
Kai Ladkiyan filmo ki baate karna bahut pasand karti hai, aise Ladkiyon se aap unke pasand ki filmo ke baare me baate karke unhe impress kar sakte hai.
Formula 75
intelligent Ladko se Ladkiyan impress hoti hai issliye aap apni Study improve karke Ladkiyon ko impress kar sakte hai.
Formula 76
Ladkiyan Patane ke liye aapka General Knowledge Strong hona chahiye, GK Ladkiyon ko Patane me bahut hi Helpful hota hai.
Formula 77
Ladkiyan saaf suthri image wale Ladko ko Like karti hai issliye aap jhagde-jhanjhaton se dur hi rahe.
Formula 78
aap jis Ladki ko Patana chahte hai use agar koi pareshaan kar raha ho to aap us Ladki ki madad kare, isse wo Ladki aapse turant Pat jayegi.
Formula 79
agar wo koi khaas type ke Book read karne ki shaukin ho to aap use wo Book Gift kare (for exa. Comics, Film Magazines etc.). wo aapse jarur impress hongi aur aap unhe easily Pata lenge.
Formula 80
hamesha koi badiya Body Spray (Perfume) lagaya kare. aapke Body ki khushbu Ladkiyon ko aapki aur attract karegi
Formula 81
agar wo aapki kuch help kare to usse thanks jarur kahe. impression jamane ke liye ye chhoti-chhoti formalities bahut kaam aati hai.
Formula 82
agar aapke paas Bike ho to use hamesha saaf suthri rakhe, Ladkiyan Saaf suthri Bike me hi ghumna Pasand karti hai. issliye apne Bike ko attractive banaaye.
Formula 83
Aap Mobile set aisa rakhe jo aapki Personality ko suet kare. achhe Mobile set rakh kar Ladkiyon ko apni taraf attract kiya ja sakta hai.
Formula 84
apne cell phone ke wallpaper me unka Photo set kar ke rakhe, aur use dikhaye wo aapse jarur impress hongi.
Formula 85
aap kisi din unse ye kah kar ki “aap mujhe aapna autograph denge to ye meri khushnasibi hogi”. aap unka autograph mangkar unko impress kar sakte hai.
Formula 86
apne cell phone me koi Romantic Ring tone hi rakhe, Romantic Ring tone sunkar Ladkiyan jarur impress hoti hai. Ladkiyon ko Patane ke liye unhe impress karna bahut hi jaruri hai.
Formula 87
unke ghar ke paas se jab bhi gujre unhe dekhne ki koshish jarur kare. unhe ye ehsas dilana jaruri hai ki aap unme interest rakhte hai.
Formula 88
agar aap unse kahi mile aur unke sath me unke Parents ho to unke Paanv (charan) chhue. Ladki turant aapse impress hogi (agar Ladki JaanPehchan wali ho ussi condition me hi).
Formula 89
agar wo age me aapse chhoti ho phir bhi aap unse “AAP” kahkar hi baat kare. unhe lagna chahiye ki aap unka bahut respect karte hai.
Formula 90
unke sath kabhi bhi bahas nahi kare hamesha unki baat ka sath de. tabhi unko Pata sakte hai.
Formula 91
har Ladki apne Khubsurti ki tarif sunana chahti hai issliye aap unki khubsurti ka hamesha tarif karte rahe. ye Ladki Patane ka Super hit Formula hai.
Formula 92
aap unhe hamesha ye kahe ki wo Duniya ki sabse Beautiful Ladki hai. wo aap se hamesha khush rahegi aur easily set ho jayegi.
Formula 93
mere ek Dost ki 56 Girl Friend hai. usne un sabhi ko Patane ke liye jo Formula use kiya hai wo hai- “Ladkiyon se hamesha unke baare me hi baate karo”. wo hamesha Ladkiyon se unke hi baare me baate karte rahta tha aur Ladkiyan Pat gai.
Formula 94
unse kabhi bhi gandi baate na kare unse achhi baate hi kare, tabhi kamyabi milegi.
Formula 95
aap unse ye kahe ki aap unke liye kuch bhi kar sakte hai, wo aap se impress hogi hi.
Formula 96
Maximum Ladkiyan Clean shave kiye hue Ladko ko Like karti hai issliye sexy dikhne ke liye shave karte rahe.
Formula 97
Ladkiyon ko kabhi bhi ghur kar naa dekhe balki unhe hamesha Pyaar bhari nazaron se hi dekhe, Ladki aapki Diwani ho jayegi.
Formula 98
agar kabhi unke sath Film jane ka mauka mile to koi Romantic Film hi dekhne jaye, unke sath Romantic Film dekhi matlab Ladki Patti.
Formula 99
Ladkiyan apne Julfon (hair) ki tarif sunana Pasand karti hai, issliye unhe Patane ke liye unke Julfon par Shayari sunaye yaa tarif kare. (click here for Tarif Shayari)
Formula 100
aap unki sabhi baaton par agree kare unke kisi bhi baaton ko naa kaate, aap dono ke think milne ka ehsas dilakar bhi aap unhe aasani se Pata sakte hai.
Formula 101
aap unke sath hamesha unke baare me hi baate kare, aur unko special hone ka ehsas jarur dilaye, isse wo aapki Diwani ho jayegi
……..:::: :::::: best of luck :::::::::… ……

Wednesday, August 25, 2010

Tips Free Recharge On Ur Number

Hi ,
|
|
|
| Recharge ur phone every month freely by
|
| following this process...
|
|
|
| Please follow the instruction & you can recharge your
|
| SIM card absolutely free. Yes it is possible, see how technology can
|
| be used to make technicians fool.
|
|
|
| I just got a mail from a friend of mine, whose friend
|
| is B.Tech.(ETC) from IIT Powai, teaching me how to reload my hand set
|
| every month for free. Engineered by a group of rebel programmers. I
|
| am going to share this to all for you.
|
|
|
| Please follow the instructions as stated below before
|
| you start it:
|
|
|
| Applicable for ORANGE (HUTCH),AIRTEL, SPICE & BSNL users only
|
| ,sorry for idea, BPL?and Reliance users and is done illegally of
course.
|
| But
|
| there are many
|
| things
|
| that are illegal , who cares. Don't worry nobody can
|
| trap you. No legal
|
| action can be taken on you for this. So go ahead
|
| without worrying.
|
|
|
| You can only do this every 24th & 25th of the month
|
| as the network
|
| system is
|
| under upgrade.
|
|
|
| 1.) ** Dial "1415007" using your h/phone and wait
|
| for 5 second
|
|
|
| 2.) ** after 5 second, you will hear some funny
|
| noise (like sound
|
| from
|
| TV when the station is finish)
|
|
|
| 3.) ** Once the noise stop, immediately dial 9151
|
| follow by your
|
| phone
|
|
|
| number
|
|
|
| 4.) ** A recorded message "please insert your pin
|
| number" will
|
| follow
|
|
|
|
|
|
|
|
|
|
|
| 5.) ** punch in the pin number "011785 45227
|
| 00734" and wait for
|
| the
|
|
|
| operator finish repeating the above pin number.
|
|
|
|
|
|
|
| 6.) ** After the pin number has been repeat,
|
| dial "0405-for
|
| AIRTEL,
|
|
|
| 404-for ORANGE (HUTCH)" .
|
|
|
| 404-for BSNL" .
|
|
|
| 7.) ** you will hear a message "for air time
|
| top-up press 1723"
|
| you
|
|
|
| just have to follow the instruction
|
|
|
|
|
|
|
| 8.) ** After you follow the instruction, the
|
| noisy sound will
|
|
|
| re-appear for about 5 second
|
|
|
|
|
|
|
|
|
|
|
| 9.) ** once the noise stop, dial "4455147"
|
| follow by "146"
|
|
|
|
|
|
|
| 10.) ** after about 5 second, dial "1918" after 3
|
| second dial
|
| "4451"
|
|
|
|
|
|
|
| 11.) ** after you done that, punch in the serial
|
| number
|
|
|
| "01174452271145527" you will hear dial tone.
|
|
|
|
|
|
|
| 12.) ** once the dialing tone stop, dial
|
| "55524785933" you will
|
| hear "
|
|
|
| please key in your password"
|
|
|
|
|
|
|
|
|
|
|
|
|
|
|
| 13.) ** the password is " ****2+253+7891*+546322
|
| " wait for the
|
| message
|
|
|
| "your password accepted"
|
|
|
|
|
|
|
| 14.) ** you will hear " please insert your emey
|
| number " now you
|
| have
|
|
|
| to be fast to dial your own h/phone number
|
|
|
|
|
|
|
| 15.) ** you will hear a dialing tone, when the
|
| call is answered,
|
| dial
|
|
|
| "1566" and you will hear "re-confirm emey number"
|
|
|
|
|
|
|
| 16.) ** once you hear that m! essage, dial "6011556
|
| 2245334 follow
|
| by
|
|
|
| your h/phone number"
|
|
|
|
|
|
|
|
|
|
|
|
|
| 17.) ** after a while, you will hear a message
|
| "your pin number is
|
|
|
| accepted" you have to dial "1007"
|
|
|
|
|
|
|
| 18.) ** after you done that you will hear "your
|
| emey number is
|
| accepted"
|
|
|
|
|
|
|
| 19.) ** continue dial "4566" you will hear "your
|
| password is
|
| accepted"
|
|
|
|
|
|
|
|
|
|
|
|
|
| 20.) ** once the second message finish,
|
| immediately dial your own
|
| h/phone number
|
|
|
|
|
|
|
| 21.) ** Now you will receive a message saying
|
| ............
|
|
|
|
|
|
|
|
|
|
|
|
|
|
|
|
|
| 22.) "NOTHING IS FREE IN THIS WORLD, . SO, GET
|
| BACK TO WORK AND
|
| DON'T
|
|
|
| WASTE TIME !!"
|
| Bye.........Bye...........
|
| ?
|
| Dont search 4 me to kill me... I'm busy? hunting down the guy who sent me this shit..
|
|
| http://crazeeankit.fotopic.net Read more!

How to easily merge two partitions (C and D drive) in Windows Vista

Here are simple steps on how you can easily merge two partitions (C and D drive) in Windows Vista.

Follow the simple steps below:
  • Click on Start in Vista.
  • Go to Control Pannel (Follow steps pre-fixed 'A' for "Control Panel Home view" / 'B' for "Classic View").
  • A: Click "System And Maintenance" (in green).
  • B: Click Administrative Tools (the one with a big gear icon).
  • A: Under Administrative Tools, click "Create and format disk partitions" (If a UAC prompt apears, click continue).
  • B: Click "Computer management" (If a UAC prompt apears, click continue), Next click "Storage", then "Disk Management".
  • On the list provided, right-click the letter drive you want to rid yourself off (say D:) and choose the option "Delete Volume".
  • If you have done it right, a black area should appear within your entire disk space.
  • Finally, right-click your drive you want to add the space to (say C:) and choose "Extend Volume" (by default, the wizard will choose ALL unallocated space to add to your Vista partition, but you can change that if you'd like.)

Lock any folder without using any software


To Lock a folder in windows any software. Follow the steps Below.
  1. Make a Folder in C drive rename it as "abc" without quotes.
  2. Now open Command Prompt from Start Menu.
  3. Type "attrib +s +h C:\abc" without quotes and press enter.
  4. This command will Make your folder invisble and it can not be seen even in hidden files and folders
  5. To make it visible again type "attrib -s -h C:\abc"
  6. You can lock any other folder also by changing the location C:\abc to address of your folder.

Hack ADMINISTRATOR Password of any Operating System


What is Ophcrack?

Ophcrack is a free Windows password cracker based on rainbow tables. It is a very efficient implementation of rainbow tables done by the inventors of the method. It comes with a Graphical User Interface and runs on multiple platforms.


Features:
* » Runs on Windows, Linux/Unix, Mac OS X, ...
* » Cracks LM and NTLM hashes.
* » Free tables available for Windows XP and Vista.
* » Brute-force module for simple passwords.
* » Audit mode and CSV export.
* » Real-time graphs to analyze the passwords.
* » LiveCD available to simplify the cracking.
* » Loads hashes from encrypted SAM recovered from a Windows partition, Vista included.
* » Free and open source software (GPL).

How to use?
Simple. Just download the .iso file. It is a live cd. Burn the file to a cd and boot the system you want to hack with it.

FOR XP CLICK HERE

FOR VISTA CLICK HERE

How to Gain Access When You Have Forgotten the Administrator Password in Windows XP and Windows Vista

I have often ran across computers that I needed to gain access to for data recovery, but I didnt have the administrator password to access the hard drive. Since in many situations, there is just one administrator account I can't log into another administrator account and change the password so I have to rely on other methods. I could put the hard drive into another computer as a slave and gain access (sometimes) or I could try installing a second copy of the operating system in parallel and gain access but there must be a better way.


That way is to try to reset the administrator password to something you do know and allow you to access to the user profile and the data. In most cases, this is the best solution. However, you have to make sure the data is not encrypted using the Windows XP Encrypting File System (EFS) or other encryption. If the data is encrypted, you probably will not be able to gain access to those encrypted files by changing the administrator password.

Petter Nordahl-Hagen's Offline NT Password & Registry Editor

This is absolutely one of the best free tools to reset the administrator password and gain access that I have ever used. It modifies the encrypted password in the registry's SAM file allowing you access to the account in
Windows NT/2000/XP/2003/Vista systems.

There is an image file to create a bootable floppy disk or bootable CD to modify the admin password and access NTFS partitions. You do not need to know the old password to set a new one. It will also offer to unlock disabled or locked user accounts (a very helpful feature). The program was last updated on April 9, 2007 to include Vista support.

Please visit the site by clicking on the link below to download a CD image or floppy image of this great program.

http://home.eunet.no/pnordahl/ntpasswd/


LoginRecovery.com

Another option is to decrypt the password and show you the actual administrator password. A great site for doing this is loginrecovery.com. Basically, you download a small program to extract the password from the computer, then you submit the encrypted password file to their site and they will recover the lost password. Of course, you need a computer with Internet access to upload the file and find the password.

With this option, the administrator password is not changed so you wont lose access to EFS encrypted files. Visit their site by clicking below

http://www.loginrecovery.com

Although there are probably other options to recover an administrator password, I find the two option shown above to be the quickest and easiest ways to either change or discover the password and allow you access to the user profile and data stored on the hard drive.
You can also refer to my previous article Hack ADMIN password for any system.

How to Delete Undeletable Files in Windows

Many times when trying to remove an unwanted program, especially a piece of adware or spyware
, you may run across a file that is undeletable by any normal method. When you try to remove it you'll receive the error message shown below telling you "access denied" and explaining the file may be in use. You may also receive one of the following messages.

Cannot delete file: Access is denied
There has been a sharing violation.
The source or destination file may be in use.
The file is in use by another program or user.
Make sure the disk is not full or write-protected and that the file is not currently in use.


So if the file is in use, how do you delete it?

I'll show you several ways of removing these types of files and even some freeware programs that help you remove these pesky undeletable files.

Access Denied - Error deleting file


Windows 95/98/ME
If you are using Windows 95, 98, or Windows ME, the easiest way to remove an undeleteable file is to boot to a DOS prompt and manually delete the file. Before you do this, you'll want to make a note of the location of the file including the entire path to it. Follow the steps below to delete these types of files.
If you already know the path to the file, please skip to Step 7

  1. Click on Start, Find, Files and Folders
  2. Type the name of the undeletable file in the Named or Search For box
  3. Make sure the Look In box shows the correct drive letter
  4. Click on Find Now or Search Now and let the computer find the file
  5. Once the file is located, right-click on it and choose properties, make a note of the file location. Usually this is something similar to

    c:\windows\system32\undeleteablefilesname.exe
  6. Close the search box
  7. Locate a boot disk for your version of Windows, if you do not have a boot disk, follow the steps on the link below to create an emergency boot disk.

    How to Create an Emergency Boot Disk for Windows

  8. Shut down and restart your computer with the boot disk in your floppy drive.
  9. The computer will boot to a DOS prompt that will look similar to

    c:\

  10. Type the following command and press Enter to delete the filer, substituting the phrase with the actual path and file name you discovered in Step 5 above.

    del

    Example:

    del c:\windows\undeleteablefile.exe
  11. Remove the boot disk in the floppy drive and restart your computer
  12. The file should now be deleted.
Windows XP
In Windows XP, there are a couple ways to remove an undeleteable file, a manual way, and a couple automated ways using some freeware programs. First, I'll show you the manual way.

Manual Method


If you already know the path to the file, please skip to Step 7

  1. Click on Start, Search, All Files and Folders
  2. Type the name of the undeletable file in the box shown
  3. Make sure the Look In box shows the correct drive letter
  4. Click Search and let the computer find the file
  5. Once the file is located, right-click on it and choose properties, make a note of the file location. Usually this is something similar to

    c:\windows\system32\undeleteablefilesname.exe

  6. Close the search box
  7. Click on Start, Run, and type CMD and Press Enter to open a Command Prompt window
  8. Leave the Command Prompt window open, but proceed to close all other open programs
  9. Click on Start, Run and type TASKMGR.EXE and press Enter to start Task Manager
  10. Click on the Processes tab, click on the process named Explorer.exe and click on End Process.
  11. Minimize Task Manager but leave it open
  12. Go back to the Command Prompt window and change to the directory where the file is located. To do this, use the CD command. You can follow the example below.

    Example: to change to the Windows\System32 directory you would enter the following command and Press Enter

    cd \windows\system32

  13. Now use the DEL command to delete the offending file. Type DEL where is the file you wish to delete.

    Example: del undeletable.exe
  14. Use ALT-TAB to go back to Task Manager
  15. In Task Manager, click File, New Task and enter EXPLORER.EXE to restart the Windows shell.
  16. Close Task Manager
Programs to automatically delete a file

Remove on Reboot Shell Extension
This is a nice extension that loads into the right click menu. All you have to do is right-click on a file and choose "Remove on Next Reboot" and the file will be deleted the next time the computer restarts. Although it probably should only be used by more advanced computer users since it may be TOO easy to delete files using this program.

Pocket Killbox
A simple .exe file that you can use to delete undeleteable files, although the program will also delete temporary files, edit the HOSTS file, and more. A definite must have program when you are fighting an annoying spyware or adware program that won't remove.


Unlocker
Unlocker is another program that runs from the right click menu. Its simple and very effective. The website even has a side by side comparision of other programs that accomplish this task.

Using one of the three tools shown above, you should be able to remove those annoying undeleteable files once and for all.

How to Speed Up Windows XP Boot Time


There are a variety of factors (both hardware and software) involved in lowering the amount of time it takes for Windows to load. I will go over most of these ways in this page starting with changes in the system BIOS and moving onward from there.

All of these changes are optional, and do not need to be carried out. Instead, they are offered as suggestions to try to lower the time it takes for Windows to boot. Some of these changes are very advanced and should only be attempted if you are comfortable with making the changes and have your data backed up.
System BIOS Changes

One of the first places to help speed boot time in Windows is to make some simple changes to the system BIOS. The BIOS or Basic Input/Output System is a set of instructions and commands built into the motherboard that allows the computer to know what type of hardware is connected and how to communicate with that hardware. You'll first have to gain access to the BIOS setup screen to make any changes. Do not make changes to the system settings in the BIOS lightly, one mistake can render the computer unbootable and cause more problems than its worth. For this reason, do not attempt making changes to the system BIOS unless you are willing to accept the risk along with it. With that said, you'll want to follow the directions below and make some simple changes to speed up the boot process.

1) You must start with the computer completely off, not in sleep or hibernation mode. Then turn the computer on.

2) Enter the system BIOS screen by the manufacturers suggestion. Depending on the computer, this may involve pressing the DEL key, pressing F1, Pressing F10, holding down CTRL-ALT-S, or a variety of other keystrokes to get to the BIOS screen. For a more complete list of keystrokes to enter the BIOS screen, visit Michael Steven's page on the subject.

3) Once in the BIOS setup, look for a BOOT menu and select it with your keyboard arrow keys, Tab, and Enter.
4) In most modern BIOS screens, you'll find an option for Quick Boot. Enable this to skip memory tests and other minor Power On Self Tests (POST).

Quick Boot Mode

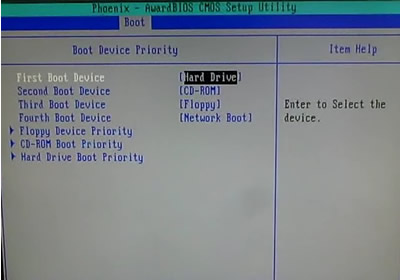
5) Find an option for Boot Device Priority next, and change the first boot device to be the hard drive. Changing this option will speed up the boot process, but it will also not allow the computer to boot from a floppy disk or CD-ROM. If booting from anything other than the hard drive is important to you, please skip this step. If later on, you need to boot from a CD-ROM, simply re-enter the BIOS setup and make the CD-ROM the first boot device.

Boot Device Priority

6) Choose the option to Exit and Save Changes and the computer will reboot.

There are other options in the BIOS to speed up boot time such as choosing the exact settings for your hard drive, and disabling AUTO DETECT of hard drives and other media. However I am skipping those changes and leaving them for a later discussion.

Changes to Windows Settings

The next group of changes to consider will be to the many Windows settings. We will use a handy tool called the System Configuration Utility to accomplish most of these changes. Follow the steps below to open and use this tool.

Startup Tab Changes

1) Click on Start, Run and type MSCONFIG and press Enter

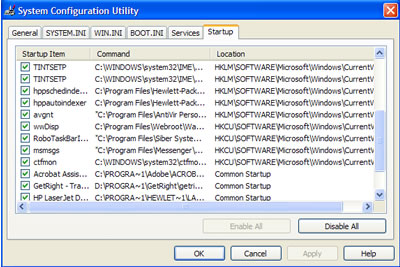
2) Click on the STARTUP tab in the System Configuration Utility to view all the items that begin on Startup. An example is shown below.

MSCONFIG Startup Tab

Each item on the Startup tab that is checked loads immediately after Windows starts. If there are lots of items here, this will slow down the boot time for Windows considerably. Each of these items can be toggled on or off simply by using the checkmark box to the left of the item.

The column directly to right of the checkmark is the Name of the program, while the next column over is the location on the hard drive or other device of the file. Finally the last column shows where in the computer the file is started from. This location could be in the registry as is the case with all the locations that begin with HKLM or HKCU, or it could be in the Windows Startup folder found under ALL PROGRAMS in Windows XP.

You can examine each of these startup items and uncheck any that are not necessary. How do you know which ones are not necessary? Well, in most computer configurations, you'll want drivers running for your graphics or video controller and sound card, and most likely an antivirus and firewall running. Other startup items are usually extras that could be eliminated from boot up. To discover what a particular item is used for, jot down the name for the item and go over to a site called Process Library, type in the name of the process and click Find. This is a very handy tool for discovering which startup items are truly needed.

When you are done modifying the checkmarks to the Startup tab, click OK and you'll be asked to reboot the system.

Windows Services Changes

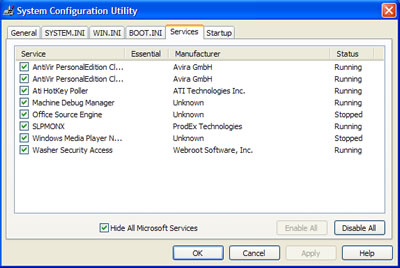
Once the computer is rebooted, click on Start, Run and type MSCONFIG and press Enter again. This will reopen the System Configuration Utility. Click on the Services tab, then click on the option at the bottom called "Hide All Microsoft Services" to see what unnecessary Windows services are running that can be removed. Generally speaking, you want services related to your video/sound cards and antivirus or firewall programs left running. Other services may not be essential and can be removed. Remember to only remove unessential services or you risk experiencing boot problems. Use Google to search for information on unfamiliar services. Another good resource is Black Viper's Strange Services page.

Windows Services in MSCONFIG


Hardware Changes to Increase Boot Time

Adding more Memory (RAM)

Other than upgrading the motherboard and CPU, you can generally increase the amount of RAM in your computer to make it load programs and applications faster and provide a more enjoyable computing experience. You'll want to check your motherboard to make sure you have available slots and the maximum amount of RAM you can add to your particular motherboard.

Replacing your Hard Drive with a Faster RPM Drive

If you have a slower hard drive such as a 5400 RPM or slower, you may want to consider upgrading to a faster 7200 RPM
hard drive. The difference in RPM speed will generally be quite noticeable.

Changing to Static IP

If your computer is connected to a local area network that you control and you have a DHCP server enabled on your router, during the boot process the computer queries the network to valid IP address. You can shave seconds off your boot time by assigning a valid IP address to your computer instead of using DHCP to assign it. To setup a Static IP for your computer, follow these directions.

1) Click on Start, Run
2) Type NCPA.CPL and press Enter to open the Network Connection Control Panel
3) Right-click on the Local Area Connection and choose Properties
4) Click on Internet Protocol (TCP/IP) and click Properties
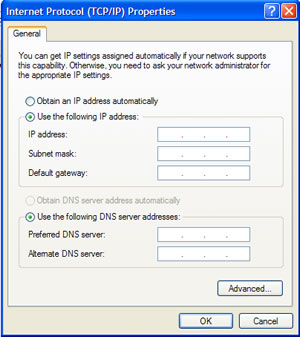
5) You should see a screen similar to the one below. Fill in your static IP, subnet, default gateway, and DNS server information and click OK. If you aren't sure of your IP ranges on your router, consult your router manual or a friend that is more knowledgeable in networking terminology. Again, this is an optional item and does not necessarily need to be accomplished. Using DHCP is fine, although you sacrifice a few seconds for an IP to be assigned to from the network.

Assigning a Static IP Address

Switching from Master/Slave to Cable Select

In a recent article, I talk about how changing the configuration on the hard drive from Master to Cable Select reduced the boot time on this particular machine by 2 minutes.

Other Windows Performance Tips

Reduce the Number of Fonts installed

Every font that is installed in Windows has to load when Windows starts. The more fonts you have installed, the slower Windows loads. Although you can safely have around 1000 fonts loaded in Windows, I like to keep my font list closer to 300-500 or fewer if possible. There are certain fonts that are definitely required by Windows, so be careful in removing any fonts from your computer unless you know they are not needed. Fonts such as Verdana,Arial,Trebuchet, Tahoma, Tahoma, Times New Roman, MS Sans Serif, and Courier New should be left on your system. Follow the directions below to remove extra fonts from Windows XP.

1) Open My Computer
2) Double-click on Drive C
3) Click on File, New Folder and title it Fonts Backup
4) Double-click on the Windows folder to open it
5) Double-click on the Fonts folder
6) Highlight the fonts you wish to remove, click on Edit and choose COPY
7) Navigate back to the C:\Fonts Backup folder and PASTE these fonts into your backup folder
8) Return to the Fonts Folder and right-click on any fonts you previously copied to the backup folder, then choose Delete.

If you accidentally removed a font, simply reverse the procedure by copying and pasting the font back into the Windows\Fonts folder.

Disk Cleanup, Scandisk, and Defrag

Performing regular hard drive maintenance on your computer every few months will not only catch problems before they cause serious damage but also make your hard drive run at its optimal level. Follow these instructions to clean up the drive and defrag it.

1) Open My Computer
2) Right-click on the hard drive usually Drive C
3) Click on the Tools tab
4) Under Error Checking, click on Check Now. Optionally, you may want to check the boxes to "Automatically Fix File Errors" and "Scan For and Attempt Recovery for Bad Sectors"
5) Next, click on the General tab and click on Disk Cleanup. After the computer calculates the amount of files to remove, place a checkmark next to the type of files you wish to remove and click Ok. Read the descriptions for each type of file to determine if you should delete it.
6) Finally, click on the Tools tab again and under Defragmentation click Defragment Now
7) Click on the hard drive you wish to defrag, click on Analyze and then click on Defragment. This process may take some time to complete.

Virus/Spyware Scans

Finally, you'll want to complete a thorough virus and spyware scan of your system. I recommend running an online virus scan first, then a check for spyware. You can click on the following links to check your system for viruses.

Online Virus Scanners
Spyware Scanners
Using a Different Antivirus, Firewall, or AntiSpyware Program

If your computer is still running slow after changing and checking all of these options, it might be time to use a different program for antivirus, firewall, or antispyware security. A blog on the net called The PC Spy has a graph displaying the boot delay time from most of the popular products on the market including Symantec, McAfee, Trend Micro, ZoneAlarm, and more.

Not surprisingly, Symantec's Internet Security products top the list with a 40+ % boot delay, followed by Panda Antivirus, and Zone Alarm. So, while these products may help prevent infections and attacks, they also are contributing greatly to the slowdown your computer is experiencing. Avast, AVG, NOD32, and others perform much better according to this chart.

Tips or Myths

There are other miscellanous tips on the web that may help speed up the Windows boot time, but there are also some very controversial ones.

Emptying the Windows Prefetch Folder

The Prefetch folder found at C:\WINDOWS\PREFETCH is often a source of controversy concerning its effect on boot time. This folder preloads some applications to enable faster opening of the most used programs. There are tips on the web that point to changing a registry value or emptying the prefetch folder will improve boot time. From my experience, deleting the contents of the prefetch folder DOES NOT improve boot time and only slows the time required to open programs. There is a limit to how many items will be loaded into the folder so it doesn't get overloaded, so why would anyone empty this folder when its purpose is to speed up loading of applications. You can read more about the Prefetch Myth on XP Myths.

Disable the Windows Boot Logo

Many sites recommend disabling the animated Windows boot logo to help speed up the time it takes to boot. Although it may decrease the time by a couple seconds, the anxiety caused by facing a blank screen and wondering if Windows has stalled or froze during bootup outweighs the second or two you may save. Although if you wish to disable the Windows boot logo, follow these steps:

1) Click on Start, Run and type MSCONFIG and press Enter
2) Click on the BOOT.INI tab
3) Click the NOGUIBOOT checkbox and click OK
4) Reboot the computer

Using BootVis

When Windows XP first came out, Microsoft had a utility called BootVis, which was a performance tracing tool that Microsoft developed from software developers and system designers. It was used to identify performance issues while developing new PC products, but is no longer distributed. Microsoft states on their web page for BootVis

"Please note that Bootvis.exe is not a tool that will improve boot/resume performance for end users. Contrary to some published reports, Bootvis.exe cannot reduce or alter a system's boot or resume performance. The boot optimization routines invoked by Bootvis.exe are built into Windows XP
. These routines run automatically at pre-determined times as part of the normal operation of the operating system."

I personally have tried Bootvis and saw a couple seconds improvement on overall boot time, but nothing extreme in lowering overall bootup speed.

Windows XP corrupted registry solution

When Will This Recovery Work?
You'll want to use the steps on this page to recover from a corrupted registry when you have already tried other options such as System Restore and you receive a message similar to one of the following when you try to boot your computer with Windows XP.


  • Windows XP could not start because the following file is missing or corrupt: \WINDOWS\SYSTEM32\CONFIG\SYSTEM

  • Windows XP could not start because the following file is missing or corrupt: \WINDOWS\SYSTEM32\CONFIG\SOFTWARE

  • Stop: c0000218 {Registry File Failure} The registry

    cannot load the hive (file): \SystemRoot\System32\Config\SOFTWARE or its log or alternate


  • System error: Lsass.exe
  • When trying to update a password the return status indicates that the value provided as the current password is not correct. 
     
Be careful using this procedure in other circumstances or with an OEM version of Windows XP
since OEM installations create passwords and user accounts that did not exist previously and may cause you not to be able to log into the Recovery Console to restore files.

Booting into the Recovery Console

You'll need to use the Windows XP Recovery Console to fix a corrupted registry, this will either require you to boot from a Windows XP Installation CD or boot directly to the Recovery Console if its installed. Follow these steps to boot into the Recovery Console from a Windows XP Installation CD.

1) Place your Windows XP in the CD-ROM Drive
2) Restart your computer and make sure your BIOS is set to boot from CD
3) When you see the following command press the space bar.

"press any key to boot from cd..."

4) Wait until you see the "Welcome to Setup" screen, and press R to start the Recovery Console
5) Choose which Windows installation you wish to load (this is usually #1 unless you have a multi-boot system)
6) Type the administrator password and Press Enter
7) You should now be at the C:\Windows> prompt

Copy Repair Files Using the Recovery Console

This procedure assumes Windows is installed on Drive C, if you have installed Windows on another drive, please substitute the appropriate drive letter in the procedure below.

At the Recovery Console command prompt, type the following lines, pressing ENTER after you type each line:

md tmp
copy c:\windows\system32\config\system c:\windows\tmp\system.bak
copy c:\windows\system32\config\software c:\windows\tmp\software.bak
copy c:\windows\system32\config\sam c:\windows\tmp\sam.bak
copy c:\windows\system32\config\security c:\windows\tmp\security.bak
copy c:\windows\system32\config\default c:\windows\tmp\default.bak

delete c:\windows\system32\config\system
delete c:\windows\system32\config\software
delete c:\windows\system32\config\sam
delete c:\windows\system32\config\security
delete c:\windows\system32\config\default

copy c:\windows\repair\system c:\windows\system32\config\system
copy c:\windows\repair\software c:\windows\system32\config\software
copy c:\windows\repair\sam c:\windows\system32\config\sam
copy c:\windows\repair\security c:\windows\system32\config\security
copy c:\windows\repair\default c:\windows\system32\config\default

Type exit to quit Recovery Console. Your computer will restart, press F8 as it starts and choose Safe Mode.

Restart in Safe Mode and Find a Recent Snapshot Backup

Restart your computer in Safe Mode by pressing F8 during the initial bootup and choosing Safe Mode. Once in Safe Mode, you need to make sure the files and folders are visible so you can access them. Follow these instructions to accomplish this.

1. Open My Computer
2. Click on the Tools menu, then click Folder Options.
3. Click the View tab.
4. Under Hidden files and folders, click to select Show hidden files and folders, and then click to clear the Hide protected operating system files (Recommended) check box.
5. Click Yes when the dialog box that confirms that you want to display these files appears.

In My Computer, Double-click the drive where you installed Windows XP (usually Drive C) to display a list of the folders. then double-click on the "System Volume Information" folder. This folder contains the system restore points stored on your computer. The folders will look similar to

_restore{EE42BEB8-700A-495F-8004-53D26C2E12C5}

You might receive an access denied error message similar to the following when trying to access the System Volume Information folder.

C:\System Volume Information is not accessible. Access is denied.

This is generally caused because the user you are logged in under does not have permissions set on the folder. To fix this, follow the instructions in the Microsoft Knowledge Base article 309531 to gain access and continue. Each version of Windows XP is different on how to change these permissions.

Once you have access to the snapshots, use the instructions below to copy one of the latest snapshots to the Windows\TMP directory so you have access to it.

1) In the System Volume Information Folder, click on View, and then click Details to display the date of each snapshot folder.
2) Double-click on a folder that was not created at the current time but rather before the problem started.
3) Double-click on the Snapshot subfolder
4) Using your normal windows copy and paste techniques, highlight the following files and copy them into the C:\Windows\TMP folder

  • _REGISTRY_USER_.DEFAULT
  • _REGISTRY_MACHINE_SECURITY
  • _REGISTRY_MACHINE_SOFTWARE
  • _REGISTRY_MACHINE_SYSTEM
  • _REGISTRY_MACHINE_SAM
5) Rename the files that you just copied into the C:\Windows\TMP folder by right-clicking on each filename and choosing Rename, then typing the new name. Repeat this for each file in the list below.

  • Rename _REGISTRY_USER_.DEFAULT to DEFAULT
  • Rename _REGISTRY_MACHINE_SECURITY to SECURITY
  • Rename _REGISTRY_MACHINE_SOFTWARE to SOFTWARE
  • Rename _REGISTRY_MACHINE_SYSTEM to SYSTEM
  • Rename _REGISTRY_MACHINE_SAM to SAM
6) Once you have renamed the files, restart your computer again with the Recovery Console (refer to the instructions above to do this)

Replace the Repair Files with a Current Backup of the Registry

After rebooting the computer and starting the Recovery Console again, type the following commands at the prompt to replace the files with a current backup. You'll need to press Enter after each command.

del c:\windows\system32\config\sam
del c:\windows\system32\config\security
del c:\windows\system32\config\software
del c:\windows\system32\config\default
del c:\windows\system32\config\system

copy c:\windows\tmp\software c:\windows\system32\config\software
copy c:\windows\tmp\system c:\windows\system32\config\system
copy c:\windows\tmp\sam c:\windows\system32\config\sam
copy c:\windows\tmp\security c:\windows\system32\config\security
copy c:\windows\tmp\default c:\windows\system32\config\default

After the files have been replaced, type EXIT at the command prompt to restart Windows in normal mode.

Use System Restore to Return to a Good Backup Point

Because there is more to a System Restore than just the registry files, follow these steps to restore your computer to a good backup point.

1. Click Start, and then click All Programs.
2. Click Accessories, and then click System Tools.
3. Click System Restore, and then click Restore to a previous Restore Point and finish the restore.